Thursday, October 16, 2008
Quilt Giveaway!!
Elizabeth Cranmer is giving away the most beautiful quilt. I had to share the opportunity with you, even though it just adds more names to the pot. I adore this quilt!
Tuesday, October 14, 2008
My Guys
Just thought I'd share a few pictures of what keeps me going, going, going.
My oldest, Josh, is a senoir this year. This Friday will be his last home football game :(

Chrisrtopher is in 4th grade and plays for the citys Pop Warner League. His team is also purple and gold like Joshs and he's also #7. His team is number 1 in their division, and the championship game is this Sat!!

Bradley is 14 and this is his freshman year. He didn't want to play football this year. He's our babseball player. This is after winning the city championship last year in 8th grade. He plays ball during the summer too.

Thank God winter is coming...it's my only break from bleacher butt!!
Sunday, October 12, 2008
Better Late Than Never
Sorry it's taken so long to post a couple cards I made with the card candy. My life has been nothing but work, and football.

I've been busy with last minute baby shower prep too. I'd love to show you the cute things I've done but my sister DOES read this blog. Or at least she did the day I posted her shower invitations! Little brat! Oh wait...she's 6 months preggers...BIG brat!!

I've been busy with last minute baby shower prep too. I'd love to show you the cute things I've done but my sister DOES read this blog. Or at least she did the day I posted her shower invitations! Little brat! Oh wait...she's 6 months preggers...BIG brat!!
Tuesday, September 30, 2008
Halloween/Autumn Card Candy
This yummy card candy is for yet another swap that I joined! I really like the way they turned out. I'll have to make some extra for myself!


Cuttlebug Blog Challenge
This card is for a challenge at Nildas Cuttlebug BLOG. Her first challenge was to Ink it up!
I inked up the snowflake side of my cuttlebug folder with Bashful Blue and ran it through my little green machine. I used the same layout as the invites in the previous post and added some red rhinestones for the "sparkle".

I inked up the snowflake side of my cuttlebug folder with Bashful Blue and ran it through my little green machine. I used the same layout as the invites in the previous post and added some red rhinestones for the "sparkle".

Saturday, September 27, 2008
I'm back!
It sure doesn't feel like it's been that long since I posted....but it has been forever!!
I have been busy working on my sisters baby shower. I finally finished her invitations!! All 84 of them!! I completely changed my mind from the last post about her invites. She found out she's having a girl (YEAH) so I designed the invites to match the crib bedding she picked out.
I used Papertrey Blush and Chocolate Brown, and also used the polkadot color match ribbon on some of them. I ordered 15 yrds of ribbon but that only got me through half of the invitations. I ran to three different stores trying to find a similar ribbon. I found the brown satin ribbon at Walmart and actually like it better than the polka dotted ribbon. I had all the info printed up at Kinkos in dark brown ink on white paper.
I absolutely LOVE LOVE LOVE how they turned out! They're so her style!
HER BEDDING (super cute!)

THE INVITATION

WHAT 84 INVITATIONS LOOK LIKE !

Sunday, August 31, 2008
Blog Candy!
No blog candy here...yet. But Kristin has some GREAT candy available! She has a great blog too!! Be sure to check it out.
Monday, August 25, 2008
3 X 3 Swap
I feel like it's been forever since I posted anything...oh wait...it has been forever! Thank God it's Monday, and the kids are in school, hubby is at work, I have the day off, and the cleaning I need to do is minimal! I need to get some swaps done and ready to go.
These cards are for a 3x3 embossed card swap. I used Papertreys Birds of a Feather and Birds and Swirls Cuttlebug Folder. I folded my card in half and ran the whole thing through the folder. It embossed both the front and the back of the card. I really like the look if it.


These cards are for a 3x3 embossed card swap. I used Papertreys Birds of a Feather and Birds and Swirls Cuttlebug Folder. I folded my card in half and ran the whole thing through the folder. It embossed both the front and the back of the card. I really like the look if it.


Tuesday, August 19, 2008
A Thank You
Just a quick update, finally!
I thought I'd have all this time to stamp when the kiddos went back to school. But when school started, so did sports and all the weigh ins, scrimmages and practices that come along with it. Plus, I still have to go to work. Anyway, here's a thank you card I needed. I haven't used this set in a while. The watercoloring is awful, and the picture is blurry, but I liked the way the card turned out. I need more Papertrey ribbon!! I keep grabbing this one every time!!

I thought I'd have all this time to stamp when the kiddos went back to school. But when school started, so did sports and all the weigh ins, scrimmages and practices that come along with it. Plus, I still have to go to work. Anyway, here's a thank you card I needed. I haven't used this set in a while. The watercoloring is awful, and the picture is blurry, but I liked the way the card turned out. I need more Papertrey ribbon!! I keep grabbing this one every time!!

Thursday, August 14, 2008

Great Finds
I have to show you the things I got yesterday....for nothin'!
We were in the dollar store, wandering down the aisle with all the paper, folders, notebooks and such, and I found this whole stack of envelopes in one of the bins. There was no box, or any type of package lying around that they might of come from....but I wanted those envelopes. I figured they would charge me a dollar for them, right. So I took them up to the counter and told them they were just sitting in a bin mixed in with other stuff. The lady said they probably go with these books that you can send in the mail. She also said that if there weren't many books left they would just throw the envelopes away, and she run back and check when she was done ringing people up. The line suddenly got long, but I waited. And waited. And waited. Finally the lady said to the other clerk, "just throw them in a bag, she can have them." Pretty awesome huh! I guess patience does pay off.
They are kind of an odd size, but that's okay. They're 7"x 6"1/4. I can make them work! Oh...and there's 82 of them!!!

Later that night, hubby and I were on our walk.
Now, I don't make a habit of digging through people's trash, but as we topped a hill, these old soda crates were just sitting on top of someones garbage. Aren't they kind of cool. I can just picture the Pepsi one on a checkered tablecloth, at a summer party, with some kind of treats or tall glasses of lemonade in it! The one on the bottom does have the Coke Cola logo on it, but it's very faint.

Tuesday, August 12, 2008
Altered Notebook....the Tutorial
I had some time on my hands today before work. It's the first day of school here, Christopher is now in 4th grade, Bradley is a FRESHMAN!! and my Joshie Poo is a SENIOR!!! Really, where does the time go :(
Anyway, enough feeling sorry for myself, onto the fun stuff....
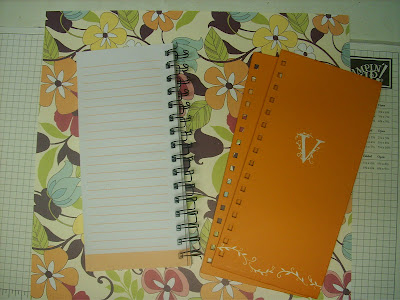
I had so much fun doing the last tutorial that I'm going to show you how I altered the Michaels notebooks.
There's no set in stone way to do it, this is just how I did it, and I'll try my best to explain it.
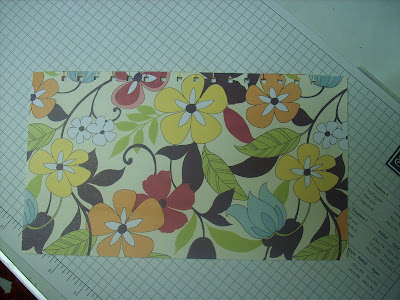
First step is to take the cover off the notebook and find some coordinating scrapbook paper. These notebooks have some color on the paper itself so it looks nice to have the cover colors match. The binding is also very easy to pull apart. My notebook has a light orange color inside so I chose this pretty paper from The Paper Studio.
I cut my paper to be about 1/2 inch longer than the cover, if it's much longer you will cover up the holes when you go to fold the paper over the side, and about 1 inch wider.
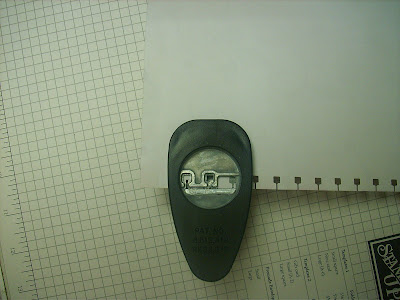
I used Stampin' Up!s spiral punch. I don't know if there's another version out there or not. This particular punch has a little metal "nub" inside on the end to use for lining up the corner of your paper. The white arrows are pointing to it. I didn't want to start punching the tabs at the end of my paper or there would be extra holes that would show up on the edge of my cover. What I did was lay down my cover on the paper and mark with a pencil the last hole. Then with my scissors I cut a little slit for the "nub" to fit into to start my hole puching further away from the edge. As I got near the end I placed the "nub" in the second to last hole in order to punch only one hole at the end. Again, I didn't want extra holes.

To go back and puch the hole where I cut my slit, I simply flipped my paper over and put the "nub" in the second to last hole again to get only one hole punched.
Now that I have my paper for the covers cut I cut a small strip of paper the same length as the longest side. This is to cover the exposed edge where the binding goes and give it a more finished look, Because there is no way to wrap the paper aroung where the tabs are. I use Modge Podge to glue the paper on.
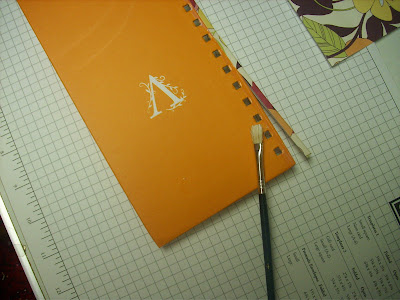
Cover the entire surface of the cover with glue, line up your holes and attach your paper. This is another reason to have matching paper, sometimes the holes don't line up exactly and some of the cover color may show. What do you expect with a $1 notebook, right.
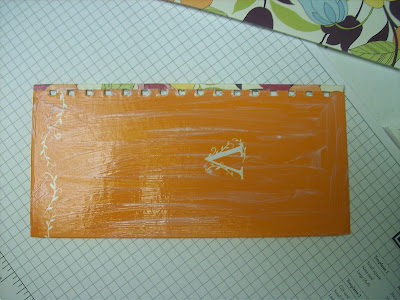
I completely for got to take pictures of wrapping the paper around the notebook, but just flip your cover over and like a present, fold and glue the paper around the edges of your cover. I like to start with the shorter ends.
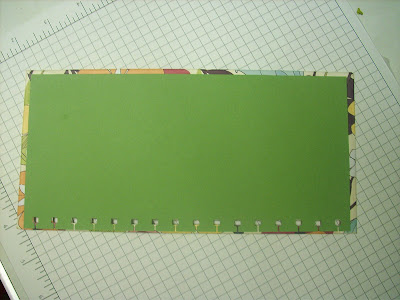
Next you need to cover up the inside of the cover where the paper was glued down. I chose a matching green. I started with an 8 1/2 inch long piece and punched holes all along the edge. It doesn't matter this time if you have extra holes because you will trim it short anyway.
Finished cover. Repeat all the above steps for the other cover.
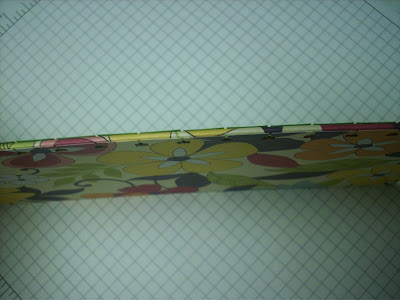
This is a picture of the edge where I glued the small strip of paper. If I hadn't done it, this would show the original orange color.
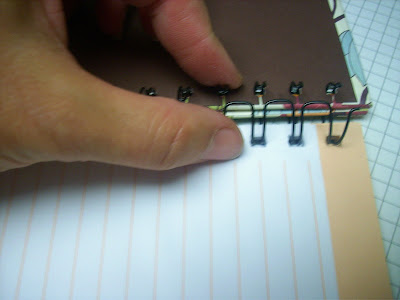
Put your cover back onto the spirals. Make sure they are facing the right way and not inside out. Then just pinch the binding back together.
I know this shows brown on the inside, I was originally going to use brown, but changed my mind to the green. Then, when I was doing the back cover I grabbed the wrong color. So just ignore it and pretend it's green :).
Embellish your finished product anyway you want!
I hope this is easy to understand. If something confuses you, please feel free to ask me any questions. And for those in suspense...the Comcast guy was right on time this morning!!
Thanks for looking!
Anyway, enough feeling sorry for myself, onto the fun stuff....
I had so much fun doing the last tutorial that I'm going to show you how I altered the Michaels notebooks.
There's no set in stone way to do it, this is just how I did it, and I'll try my best to explain it.
First step is to take the cover off the notebook and find some coordinating scrapbook paper. These notebooks have some color on the paper itself so it looks nice to have the cover colors match. The binding is also very easy to pull apart. My notebook has a light orange color inside so I chose this pretty paper from The Paper Studio.

I cut my paper to be about 1/2 inch longer than the cover, if it's much longer you will cover up the holes when you go to fold the paper over the side, and about 1 inch wider.
I used Stampin' Up!s spiral punch. I don't know if there's another version out there or not. This particular punch has a little metal "nub" inside on the end to use for lining up the corner of your paper. The white arrows are pointing to it. I didn't want to start punching the tabs at the end of my paper or there would be extra holes that would show up on the edge of my cover. What I did was lay down my cover on the paper and mark with a pencil the last hole. Then with my scissors I cut a little slit for the "nub" to fit into to start my hole puching further away from the edge. As I got near the end I placed the "nub" in the second to last hole in order to punch only one hole at the end. Again, I didn't want extra holes.

To go back and puch the hole where I cut my slit, I simply flipped my paper over and put the "nub" in the second to last hole again to get only one hole punched.

Now that I have my paper for the covers cut I cut a small strip of paper the same length as the longest side. This is to cover the exposed edge where the binding goes and give it a more finished look, Because there is no way to wrap the paper aroung where the tabs are. I use Modge Podge to glue the paper on.

Cover the entire surface of the cover with glue, line up your holes and attach your paper. This is another reason to have matching paper, sometimes the holes don't line up exactly and some of the cover color may show. What do you expect with a $1 notebook, right.

I completely for got to take pictures of wrapping the paper around the notebook, but just flip your cover over and like a present, fold and glue the paper around the edges of your cover. I like to start with the shorter ends.

Next you need to cover up the inside of the cover where the paper was glued down. I chose a matching green. I started with an 8 1/2 inch long piece and punched holes all along the edge. It doesn't matter this time if you have extra holes because you will trim it short anyway.
Finished cover. Repeat all the above steps for the other cover.

This is a picture of the edge where I glued the small strip of paper. If I hadn't done it, this would show the original orange color.

Put your cover back onto the spirals. Make sure they are facing the right way and not inside out. Then just pinch the binding back together.
I know this shows brown on the inside, I was originally going to use brown, but changed my mind to the green. Then, when I was doing the back cover I grabbed the wrong color. So just ignore it and pretend it's green :).

Embellish your finished product anyway you want!

I hope this is easy to understand. If something confuses you, please feel free to ask me any questions. And for those in suspense...the Comcast guy was right on time this morning!!
Thanks for looking!
Monday, August 11, 2008
Ink Embossed Cuttlebug background
My First Tutorial:
I've been busy with the whole back to school ritual today. Not to mention waiting for the Comcast guy, who never showed up, because they changed my appointment, and apparently didn't think I needed to know!! So, I had a little spare moment and thought I'd try something I found on You Tube! What would the world be like without You Tube? I know my house would be cleaner that's for sure!
You may have already seen this technique, but it's my first time trying it. I love the look of it and can't wait to use it more.
Start by brayering ink onto the smoother side of the Cuttlebug folder, the side where the design is etched out.

Place your cardstock inside and run it through your Cuttlebug like you normally would to emboss the paper.

The outside of the design will be the color of your ink, while the embossed part will remain the color of your cardstock.

Here's my finished product. This is the first time I tried it so I can see where it needs some tweeking, but I like the way it turned out.

Saturday, August 9, 2008
BRAVO CHINA!!!!

The Olympic opening ceremony was the most amazing thing I've ever watched! Tim was on his walk so I was recording it for him, when he got home we watched it from the beginning and it still gave me goose bumps the second time! Anybody else watch it?
How do you follow a show like that?!
Tuesday, August 5, 2008
Lovely as a Tree
This is one of those sets that I just had to have after seeing sooo many great cards made with it. Then I got it, and never use it!
This is another card for a swap. It's a mans card so I wanted to keep it simple. Not that men are simple creatures, but, well, you know what I mean. This is also the first time I really used my watercolor paper. I've seen some gorgeous, detailed coloring of this tree but I wanted a messy, watercolored look. I then layered it on another piece of watercolor paper to make it look like I embossed it with the square nestebilities. The background paper is Stampin' Ups Wintergreen. It's hard to tell but the brown strip across the middle is rough on the edges for some more texture.

.jpg)
Friday, August 1, 2008
Birds of a Feather
I need your votes!!! These are two examples of my sisters baby shower invitations, using Papertreys Birds of a Feather. The stamps themselves are small so I thought I'd make the cards 3X3. I used River Rock cardstock and Papertreys Spring Moss ribbon. Please leave a comment and let me know which one you like best. As far as we know, she's not finding out what she's having, otherwise I would use blue or pink. I don't think she reads this blog either so I'm not worried about her seeing them
Choice A: A little birdie told me...

Choice B: New Beginnings

Choice A: A little birdie told me...

Choice B: New Beginnings

I've Been Tagged!!

I'm sooo excited to have been tagged with the Blogging Friends Forever award by Jackie!! My first award! I visit Jackies blog a lot, she has some great scrapbook pages and cards. Not to mention getting it all done with 5 girls! Thanks Jackie. Now, I have to pass it on....
The rules are:
1. Only five people allowed
2. 4 of them have to be dedicated followers of your blog and 1 has to be new and live in another part of the world.
3. You have to link back to who gave you the award.
It was kind of hard to chose who to give the awards to because I'm very new to the whole blogging world and don't have too many followers, so if any of you think it's corny or cheesy I apologize :)
The award goes to...
Jennifer, we actually met because of our avatars on SCS,(cutest dogs in the world) and have become blogging friends. She's a Stampin' Up! demo and has some awesome cards on her site. She's currently at convention so I'm very jealous of her right now!!
Judy, her cards are gorgeous! I love all the layering and detail.
Tessa, also has some great eye candy on her blog and was recently choosen for the Serendipity Scrapbooks design team!
Scrappinmominky, she just amazes me with her beautiful work. She's also an adoptive mom (of many) which is close to my heart.
And last but not least ...
Judy, she is new to the stamping blogging world and has some great ideas going on her blog. Some yummy blog candy too. She's from Idaho, which is another part of the world to me :)
Tuesday, July 29, 2008
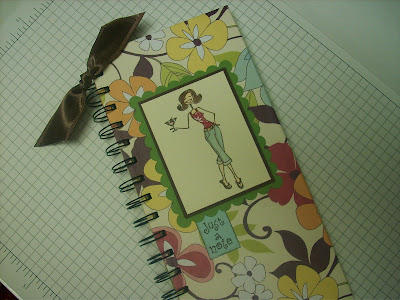
Personalized Notebook
These notebooks are so much fun to play with. I tried personalizing one for a neighbor girl. I don't have girls, so this was too much fun to work on. I was only going to put the ribbons at the top but soon realized they had to go all the way down. The name goes from the bottom of the notebook to the top. This is for a neighbor girl who comes over once in a while to play with my youngest. I'll be glad when he's over the whole "girls aren't cool" to play with thing.


Saturday, July 26, 2008
Altered Notebooks
I found these notebooks in Michaels $1 bins and thought I'd try to alter them. It's really easy once you mess the first one up and figure out a few tricks to cover the entire thing. The notebook lying down is the "before". I tried a matching bookmark too.


Friday, July 25, 2008
Vintage Quilt
I found these great old, vintage looking papers by KC Company and thought they would look good with Papertreys Quilted Sampler. I watercolored the quilt blocks, then went over it with a wash of Creamy Caramel to muddy the colors together and give it a worn look to coordinate with the worn look of the paper. I Cuttlebugged the background in Vanilla and topped it off with Papertreys Spring Moss ribbon!

Sweet As Can Be
Just a quick card today. I found some great notebooks at Michaels that I'd like to alter, but I had this card started, so I finished it really quick so I could clean up and make another mess. I used C.C Designs Sweet Treats. I wanted to use some crystal effects on the ice cream but the tip is clogged AGAIN!! I even stored it upside down like some people said to do. I used the same paper as I did on the cupcake card below, and what's a card without a Cuttlebugged background!! I can't forget the yummy ribbon from Stampin' Up! I wish they had it in every color!


Wednesday, July 23, 2008
ARE YOU SERIOUS??!!
Okay...no new post from me today, I'm too depressed from not winning Danas' quilt!
:(
:(
Tuesday, July 22, 2008
Surfs Up
I'm such a copy cat. This card is totally copied from Amy Rysavy. Well, not totally but the idea of the surfer coming out of the background. Sorry for the crooked picture. She has some mad Copic skills! My Copic collection so far consisits of 4 markers, so I had to watercolor my puppy. He looks like he has a wicked tan though doesn't he? I might use these as my sons bday invites.
.jpg)
.jpg)
Monday, July 21, 2008
Inspiration Card
One of my stamping idols is Michelle Wooderson. My card layout was inspired by this one that she did. The colors I chose were inspired by this beatuiful quilt!!


Quilted 2
Not your traditional quilt colors, but I like them together. I paper pieced the quilt blocks this time with Stampin' Up!s Wintergreen designer paper, and Soft Sky. I think the Cuttlebug Swiss Dots is one the best purchases I've ever made!


Christmas Quilt
This is the first card I made using my Quilters Sampler from Papertrey. As soon as I saw it I knew I had to somehow use my Star Santa set from Stampin' Up!. Star Santa was one of the first stamp sets I ever bought and I still love it just as much. It has that homespun look that I thought would look good with a quilt card. I watercolored the blocks and crumpled the red paper to give it a softer look.
Thanks for looking. I have yet to master the art of a really good clear picture!

Thanks for looking. I have yet to master the art of a really good clear picture!

New Toys
I got my goodies from Papertrey and my order from All That Scraps!!! I just love those C.C Designs stamps! I wish I had taken a picture of the Papertrey stamps before I put them all together, the packaging was just beautiful. It was like getting a present! I got some cute "beachy" paper too to use with the Summertime Fun set! I love this card that Amy Rysavy made! Her samples made me want this set!!
I'm rushing around trying to get housework done so I can actually sit for more than a minute and play with them today. Wish me luck!

I'm rushing around trying to get housework done so I can actually sit for more than a minute and play with them today. Wish me luck!

Sunday, July 20, 2008
Been awhile....
I just had to post this. Mayas Hobbyblogg is giving away some delicious blog candy! Take at look at her wonderful blog and those adorable images she's giving away!
Friday, July 18, 2008
What the.....
No new card from me yet, to busy cleaning up this mess!
What happens when the cold water from a sprinkler hits a hot glass table in 90 degree weather?......

What happens when the cold water from a sprinkler hits a hot glass table in 90 degree weather?......

Wednesday, July 16, 2008
"Classic" Birthday
I needed some male birthday cards for another swap I'm doing. I soon realized that I don't really have anything to use for a mans card except the Classic Convertible or a tree. :(
I didn't want to color the car so I stamped it in Navy. I also used the Cuttlebug for a little detail on the Buckaroo Blue,(Yes, I have other cuttlebug folders).There were originally only three holes in the corner for some brads, but I kind of liked the look of the holes, so I left them empty. I still need some kind of embellishment for the swap so the rest of the cards will probably have the brads on them. And check it out....a different layout!
Thanks for looking.

I LOVE These Colors!!
Dana at Old Red Barn Co. is giving away this GORGEOUS quilt!! How she can part with it, I have no idea! All I know is I WANT IT!!! These are some of the prettiest fabrics! See my sidebar for a chance to win! Good Luck!
Tuesday, July 15, 2008
Hey Cupcake
This card was inpspired by the yummy paper by 3 Bugs in a Rug, that I got in anticipation of my CC Designs Sweet Treats. I couldn't wait any longer and had to use it. It reminds me a little of neopolitan ice cream so I went with some chocolatey ribbon! I promise I'll use a different layout next time, this one is just so EASY.:)


Monday, July 14, 2008
Added a Little More
The more I looked at the clown card, the more I thought it could use something else. So I added a few more details.


More Mass Production
I just had to make some girly clown cards to go with the other ones. Again, I got 12 cards out of 2 sheets of 12X12 scrapbook paper. I'd really like to find some brightly colored Primas to put on these, they seem to missing something since I used a smaller clown, and it doesn't take up as much space on the card. Plus, they're for a girl and what girl doesn't like a little bling! The Happy Birthday stamp is stamped inside. I liked the look of the wide grosgrain ribbon on the other cards but I don't have any to match these so now I have to get it all I used two thinner colors to make it look as thick as the wider ribbon. I may have to try a craft show if I can keep making 12 cards in a day!


Subscribe to:
Posts (Atom)


